Fair Cake Cutter
ECE 5725 Final Project - Spring 2021
Ching Pang (cp546) Michelle DeSouza (md722)
Demonstration Video
Introduction
For the final project, we built a cake cutting tool that cuts a round cake evenly into a desited number of pieces. The goal of the project was to allow the user to use the PiCamera align their cake with the cake stand, and the robot will carry out the cutting motion.
The full set up is shown below, and it includes a separte cake stand that is attached to the robot structure on the left by the gear. The gear is attached to a continuous rotation servo, which is control by the raspberry pi. The number of slices determines how many rotations that the gear makes, which is controlled by the duty cycle. A DC motor is used to control the rack and pinion which are responsible for the cake cutting motion.
Initially, the user is asked to align the cake with the center, which incorporated image and video capture using PiCamera, then openCV is implemented to determine the cake circumference and center of the cake. The user will then be asked to move the cake on the stand to align with the stand. Then, the user can input any number from 1 to 16 as the number of cake slices desired. The gear then rotate, and the rack and pinion carries out the cutting motion by sliding the cutter up and down. A panic stop button is also implemented so that the user can stop both rotating and cutting motion if needed. Detailed discussions are outlined in Desig & Testing and Results.
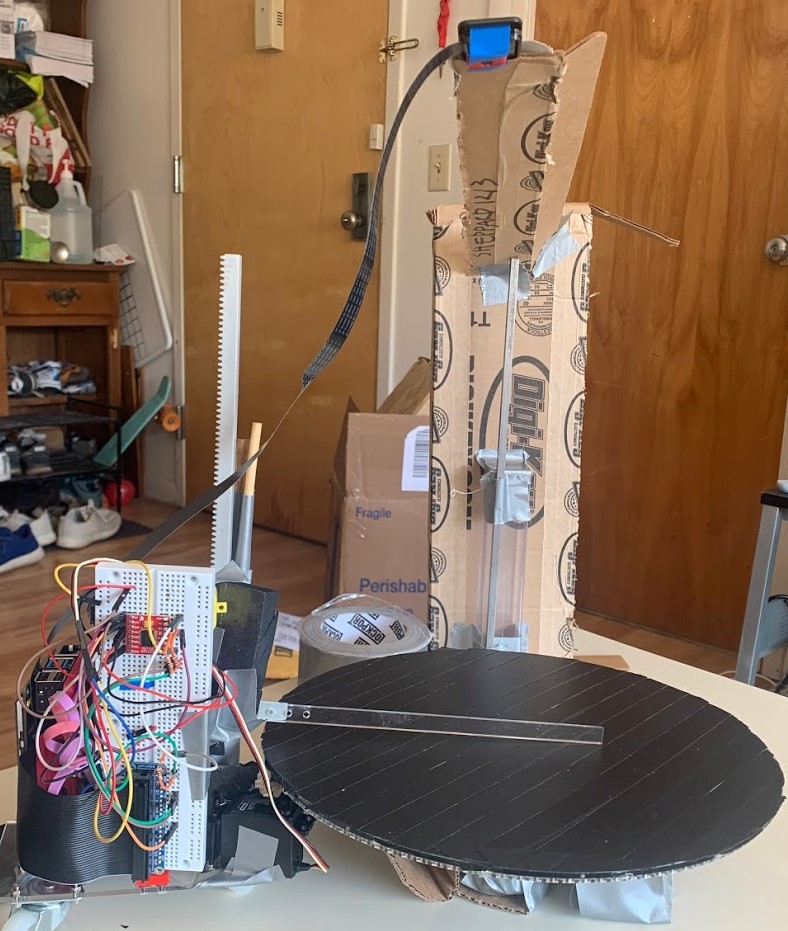
Figure 1: Full set up of cake cutter with a black cake stand at the bottom right corner and the robot with pi on the bottom left corner.
Project Objective:
- Cut a round cake into even slices up to 16 slices even for odd number of slices
- Automating the process so that the user only has to align the cake with the center of the plate with PiCamera and input the number of desired cake slices
Design and Testing
Because our design has both significant mechanical and electrical components, we were working on both aspects simultaneously.
Rotation Motion
The mechanical requirements were that we needed to have our arm cut into different parts of the cake, so the cake needed to rotate with respect to the arm, and also that our arm needed to move up and down. Initially, we planned to use camera detection to mechanically center the arm above the plate as well.
At first, we designed the rotation aspect as a motor attached to the center of the plate. The motor would rotate the plate and the cake with it, and the cutter base would stay stationary. Although at first we thought the torque produced by the DC motor would be sufficient for this purpose, but then we began to worry that our stand would not turn with heavier cakes. Additionally, the DC motor had by far the highest output torque compared to our other available options, but it is also very imprecise; we would have to set a rotation angle by running the DC motor for a specific amount of time, and the time for a given angle would vary depending on the weight of the cake. Initially, we also thought about including both round cake and rectangle cake with two different motors controlling each, however, we considered the difficulty with mechanical design, and decided to focus on cutting a round cake.
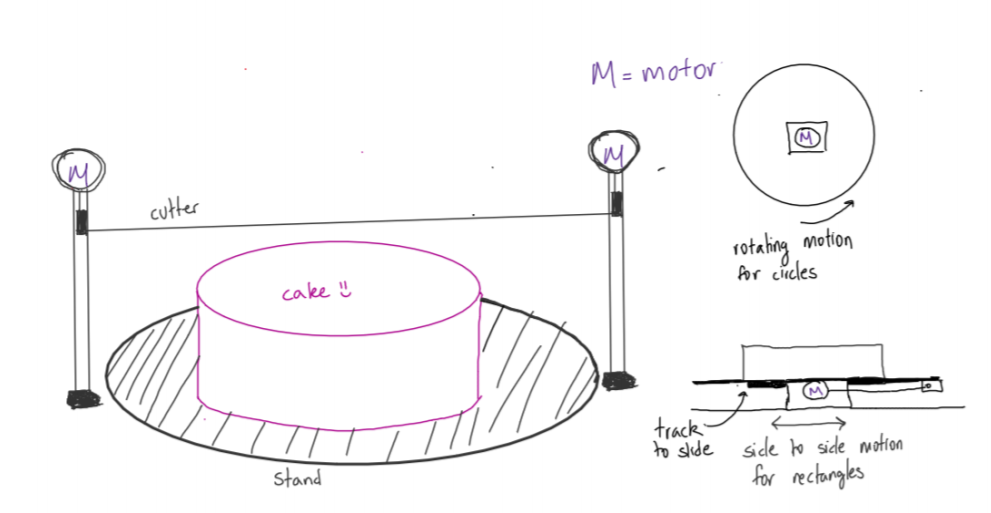
Figure 2: Initial drawing of the cake cutter with rotating cake stand
Therefore, we switched to a design where the cutter would be based on caster wheels and rotate around the plate, allowing us to use a more precise continuous rotation servo with less torque. In order to constrain our movement, we attached a spur gear to the servo motor and an internal gear to the bottom of the plate. As the servo turns, the spur gear rotates to move the entire cutter around the stationary plate.
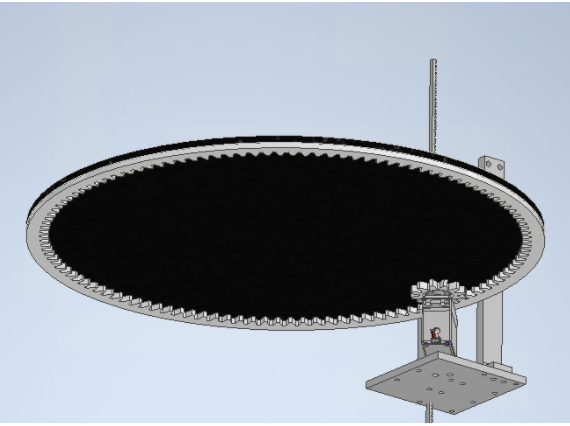
Figure 3: CAD Bottom view of the design with spur gear attached to the servo,and the gear rotates around the bottom rim of the stationary plate
Cake Cutting Motion
We at first thought of using floss in tension as the cutter, since the flexibility from the floss would allow for a smoother cutting motion. However, we had trouble maintaining sufficient tension in the floss since our top rod was hard to tie around and not go loose. Therefore, we switched to using a single acryllic thin rod, and attach it to the rack the the pinion was interacting with.
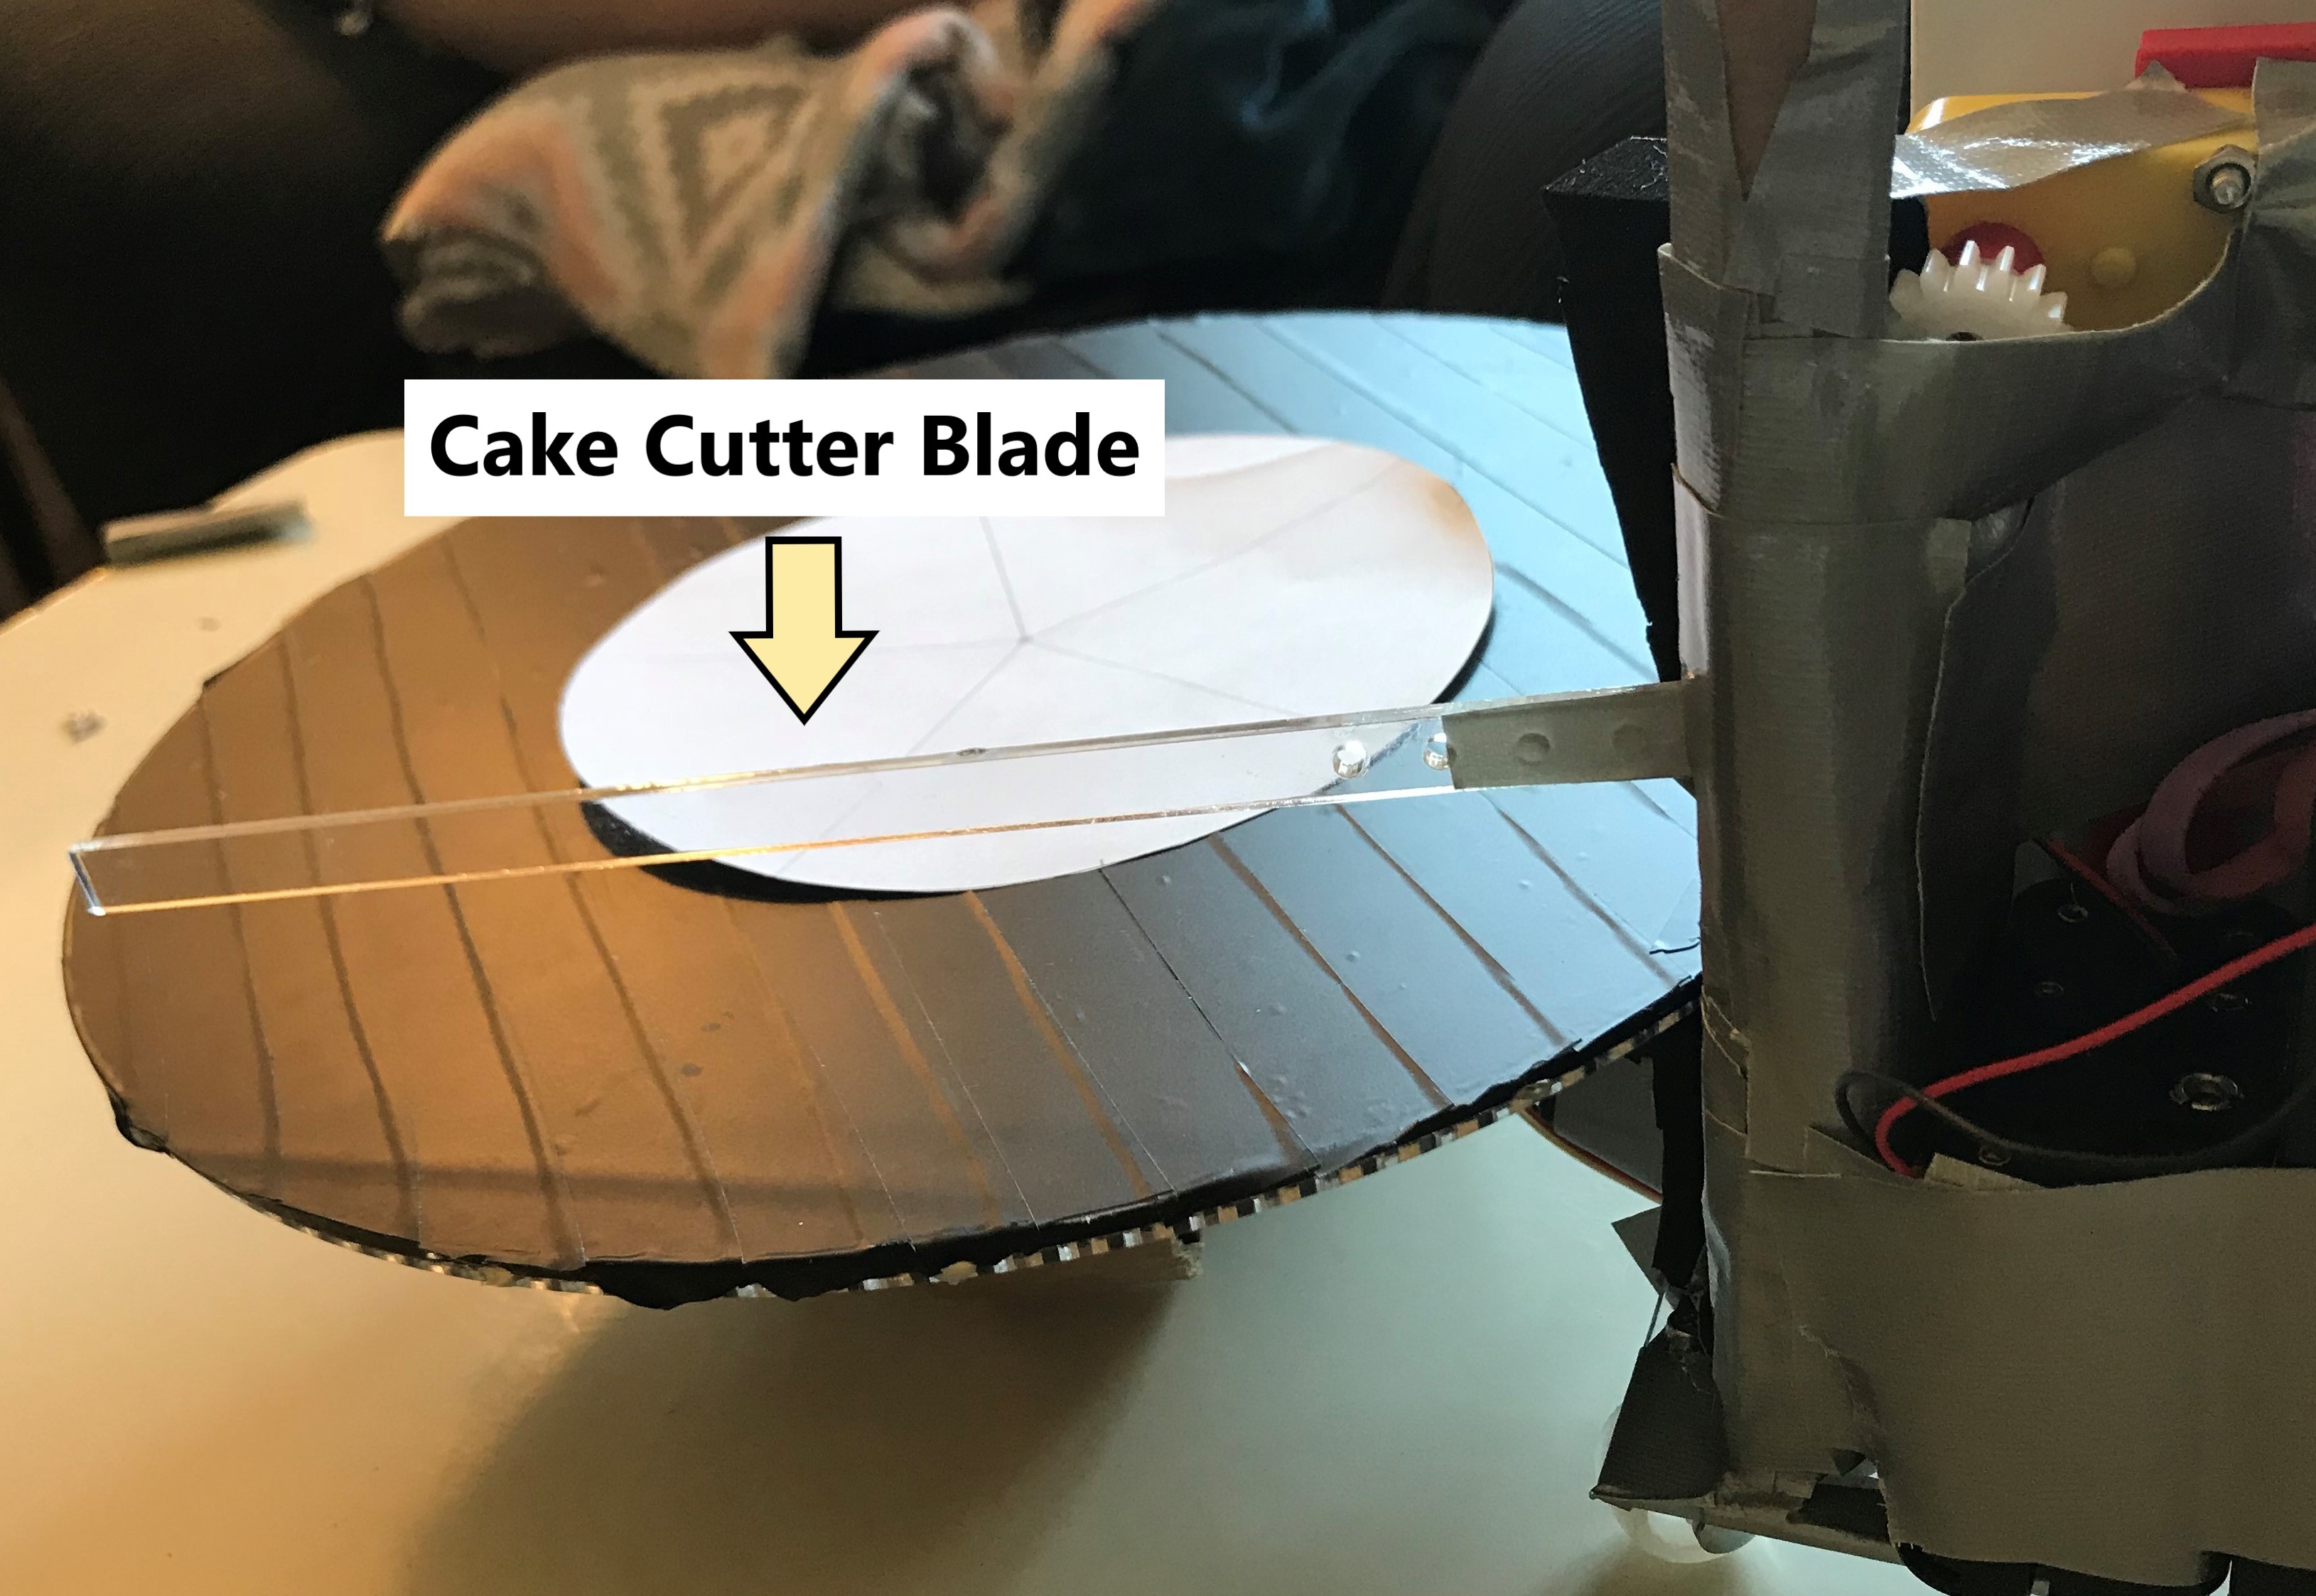
Figure 4: We converted to using a thin acryllic piece as the cake cutter blade
For the cutting mechanism, we began with a rack and pinion and stuck to this idea. However, we increased the size of our rack last-minute so that the pinion would align better, which meant that our cutter base could no longer constrain the rack. To compensate, we created a makeshift enclosure around the rack, but it still did not mesh very well with the gear. Hence, during the cake cutting motion, the rack can easily fall out of place.
We incorporated both continuous rotation motor and DC motor in our design. The continuous motor would be responsible for rotating the gear that is connected to the cake stand at the bottom, and it is controlled by PWM signal, which we originally set to GPIO pin 18, and later switchd to GPIO pin 13 as we realized that pin 18 also sends signal to the piTFT. The DC motor is connected to the GPIO pin 26, in which it outputs to GPIO pin 5 and 6. This motor is fixed at the top of the robot, and it interacts with the rack to control the up and down motion of the cutting blade. The circuit diagram and piscope output can be found below.
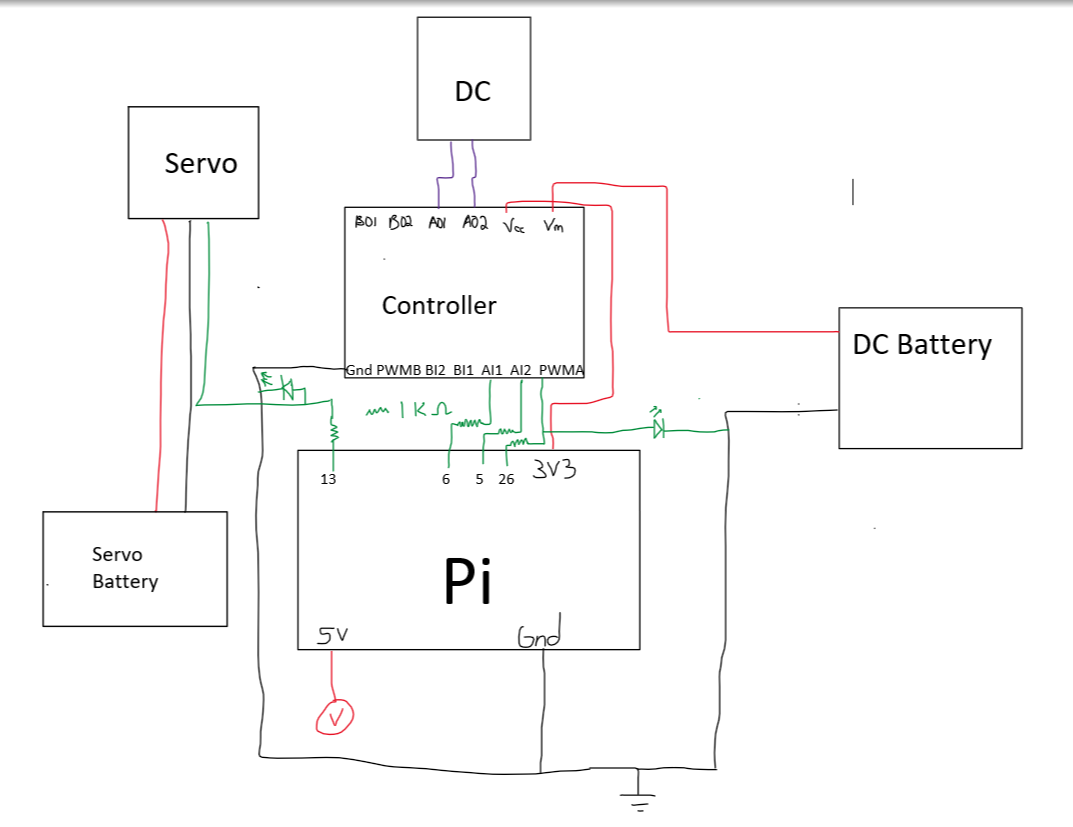
Figure 5: Circuit diagram of our set up
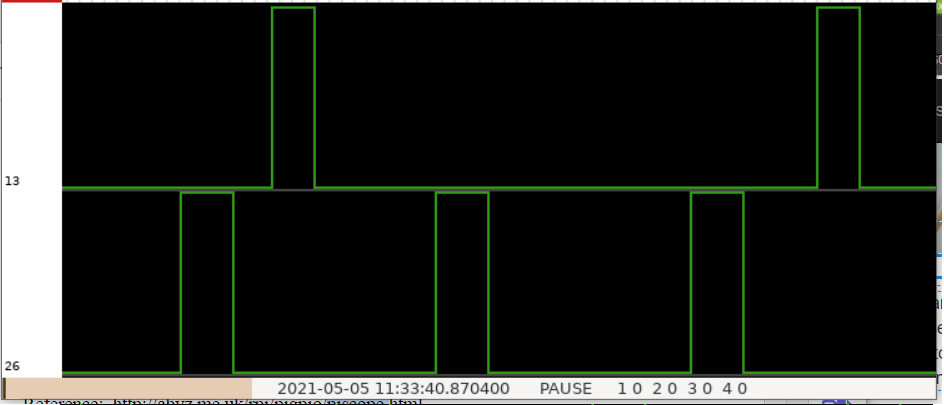
Figure 6: Piscope output while the robot is both rotating and cutting, with continuous rotation servo to pin 13, and DC motor to pin 26
Our initial plan to center the cutter over the cake was to use camera detection and move the end of the cutter above the center of the cake using a lead screw. We implemented the openCV library to process the images taken with the Pi camera. We decided to use Hough Circle algorithm to detect the circles in the pictures. However, there are limitations in the algorithm, and it often detects more than one cirlce. Therefore, we processed the image to eliminate some of the noise and keep the edges, and limited the radius of the range of the circles. We also found that since the biggest circles will usually be detected in the first couple tries, we only need to output the first three results and eliminate then. This decreased our processing time, and allowed us to find the desired circle. However, when implemented on the actual cake stand, we realized that if the cake was off-center, we would have to re-center our cutter with each rotation, which would be difficult to implement precisely with the rotation of the gears. Additionally, the lead screws that were available were either very heavy or very expensive. With that in mind, we changed our design to have our user center the cake manually, and display the centers of the cake and plate on the piTFT to aid the user.
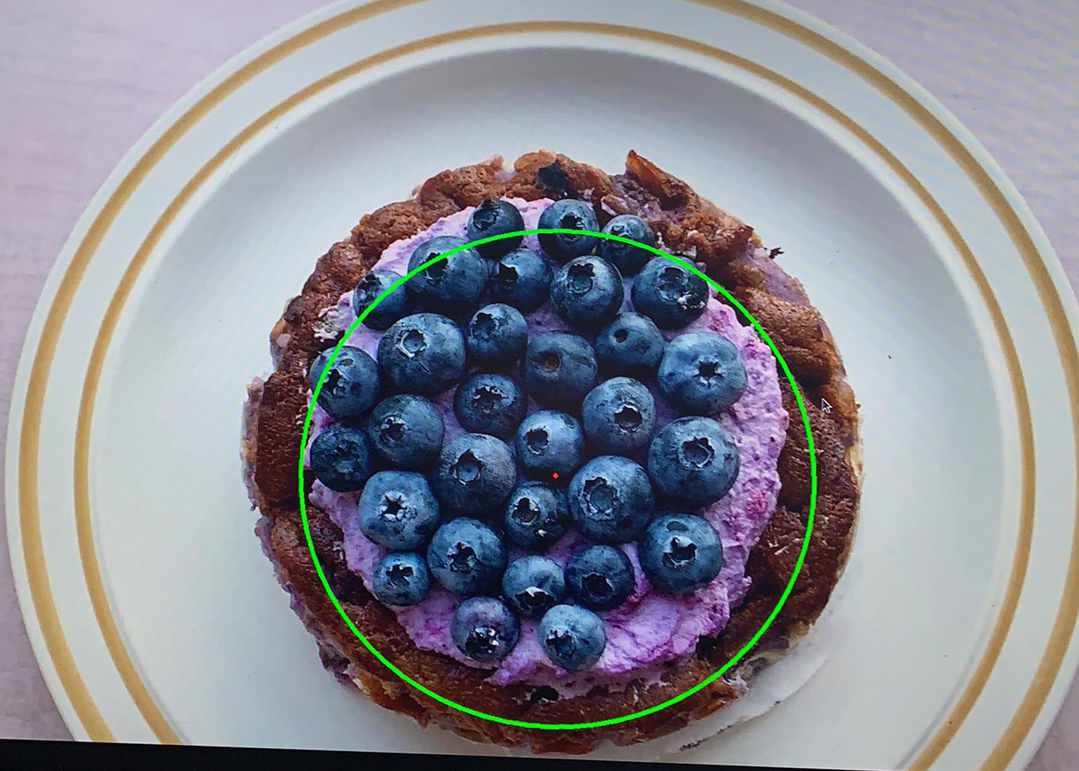
Figure 7: Using Hough Circles with opencv to detect circles in an existing picture
Our code consisted of three parts. The first part was the openCV program that operated through a camera centered above the plate. This program would take a picture of the cake, analyze the image for circles with center points (in this case the circles corresponding to the larger plate and smaller cake), and to prompt the user to re-center the cake if it was too far away. We tried to use video capture at first, but the delays associated with this feature meant that the user would actually have a difficult time using the images as a reference.
The second part was the GUI that we printed to the piTFT that allowed the user to input and confirm the number of slices that they wanted. The user could at first choose any two digit amount of slices, although we limited the range from 1 - 16. There was a reset button, and the two digit number operated on a sliding scale, meaning that if you pressed 1-3-4, the final number that would be displayed and processed is 34. Clicking the reset button will reset the number of slices back to 01. The user clicks on the confirm button to confirm the number of slices they want.
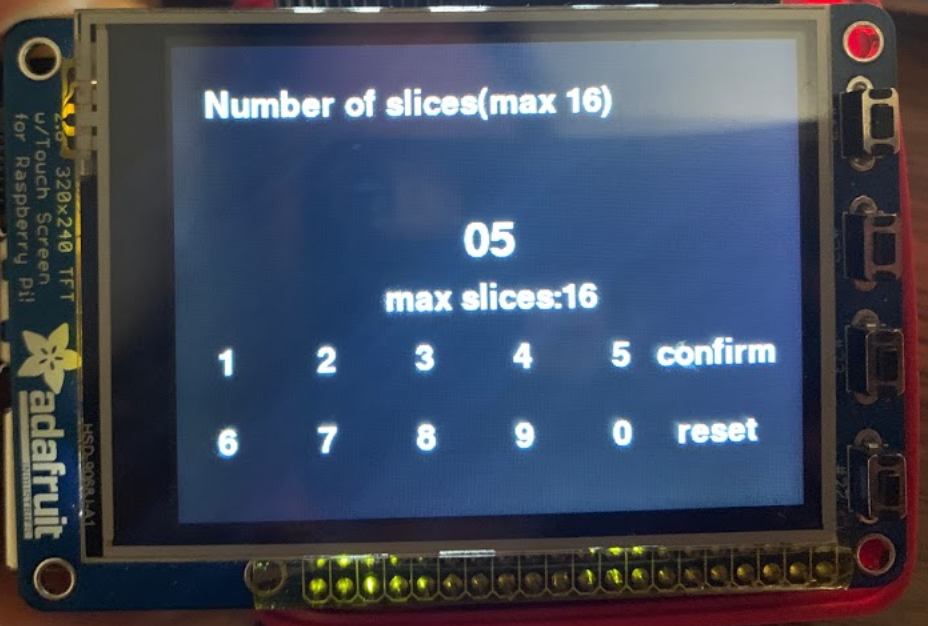
Figure 8: GUI that allows user to pick the desired number of cake slices
The final part of our coding consisted of implementing the actual cutting code. We calibrated our servo and determined the time per rotation for a given duty cycle/frequency, and multiplied this constant by the number of rotations required for the inputted number of slices. We mostly chose an arbitrary amount of time for the DC-powered cutting arm to move down and back up. We also implemented a panic button and quit button like we did in Lab 3, that would pause the cutter and resume exactly where it left off.
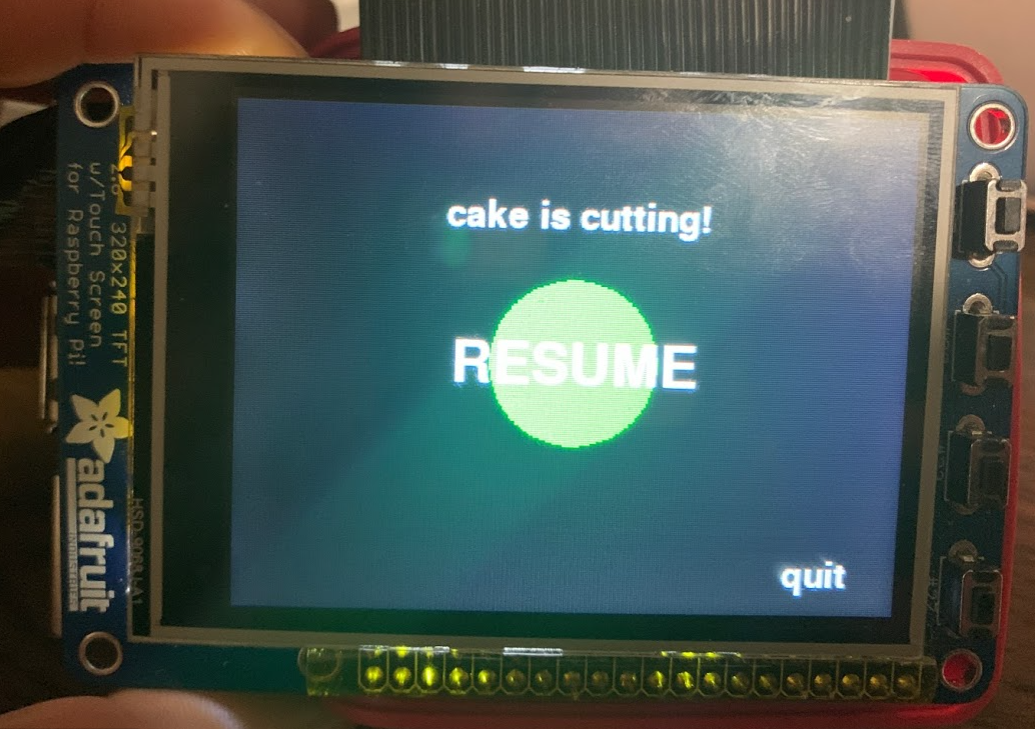
Figure 9: Panic stop button was implemented during the cake cutting process
Result
Overall, we tested both electrical and mechanical components iteratively while designing them, and made adjustments as necessary. This included calibrating our motors, testing the motion of the gears/rack and pinion, testing mechanical fits like caster wheel holes, and testing our software, especially the interactive piTFT features.
Our mechanical design went through many changes, and many of our failures were due to difficulty adjusting the rest of our design. For example, when we increased the size of the rack and pinion, the rack was no longer constrained by the hole in the cutter base, and the pinion did not fit very well on the DC motor. Additionally, when we switched from floss to a rod as our cutting mechanism, we had trouble fixing our cutter on the rack, which was already set in its orientation. This meant that sometimes when we tried to run the cutter, the rack would just slip against the pinion, meaning that the cutter would not move. Lastly, we originally wanted our cake stand to be as light as possible, so we bought acrylic to laser cut from; we did not anticipate that we would later want our stand to stay still, and struggled to keep it from turning instead of having the robot turn. We tried to fix this problem by attaching metal parts to our stand to weigh it down, but this was still unsuccessful without a heavy cake or additional large weight on top.
Figure 10: Cake cutting motion
Other mechanical problems were simply unforeseen. We could not find full dimensions for the servo gears and had to manually measure them, but did so incorrectly at first, which meant that we went through multiple iterations of spur gears to yield a good interface. Another issue that we encountered is that with only three caster wheels that were free to swivel, our cutter would sometimes become unstable and topple over completely. We fixed this issue by duct taping across the caster wheels to constrain them to one direction, and having our cutter move only clockwise. Lastly, we wanted our camera to remain stationary, but also needed it to be connected to our Raspberry Pi, which was rotating around the cutter.
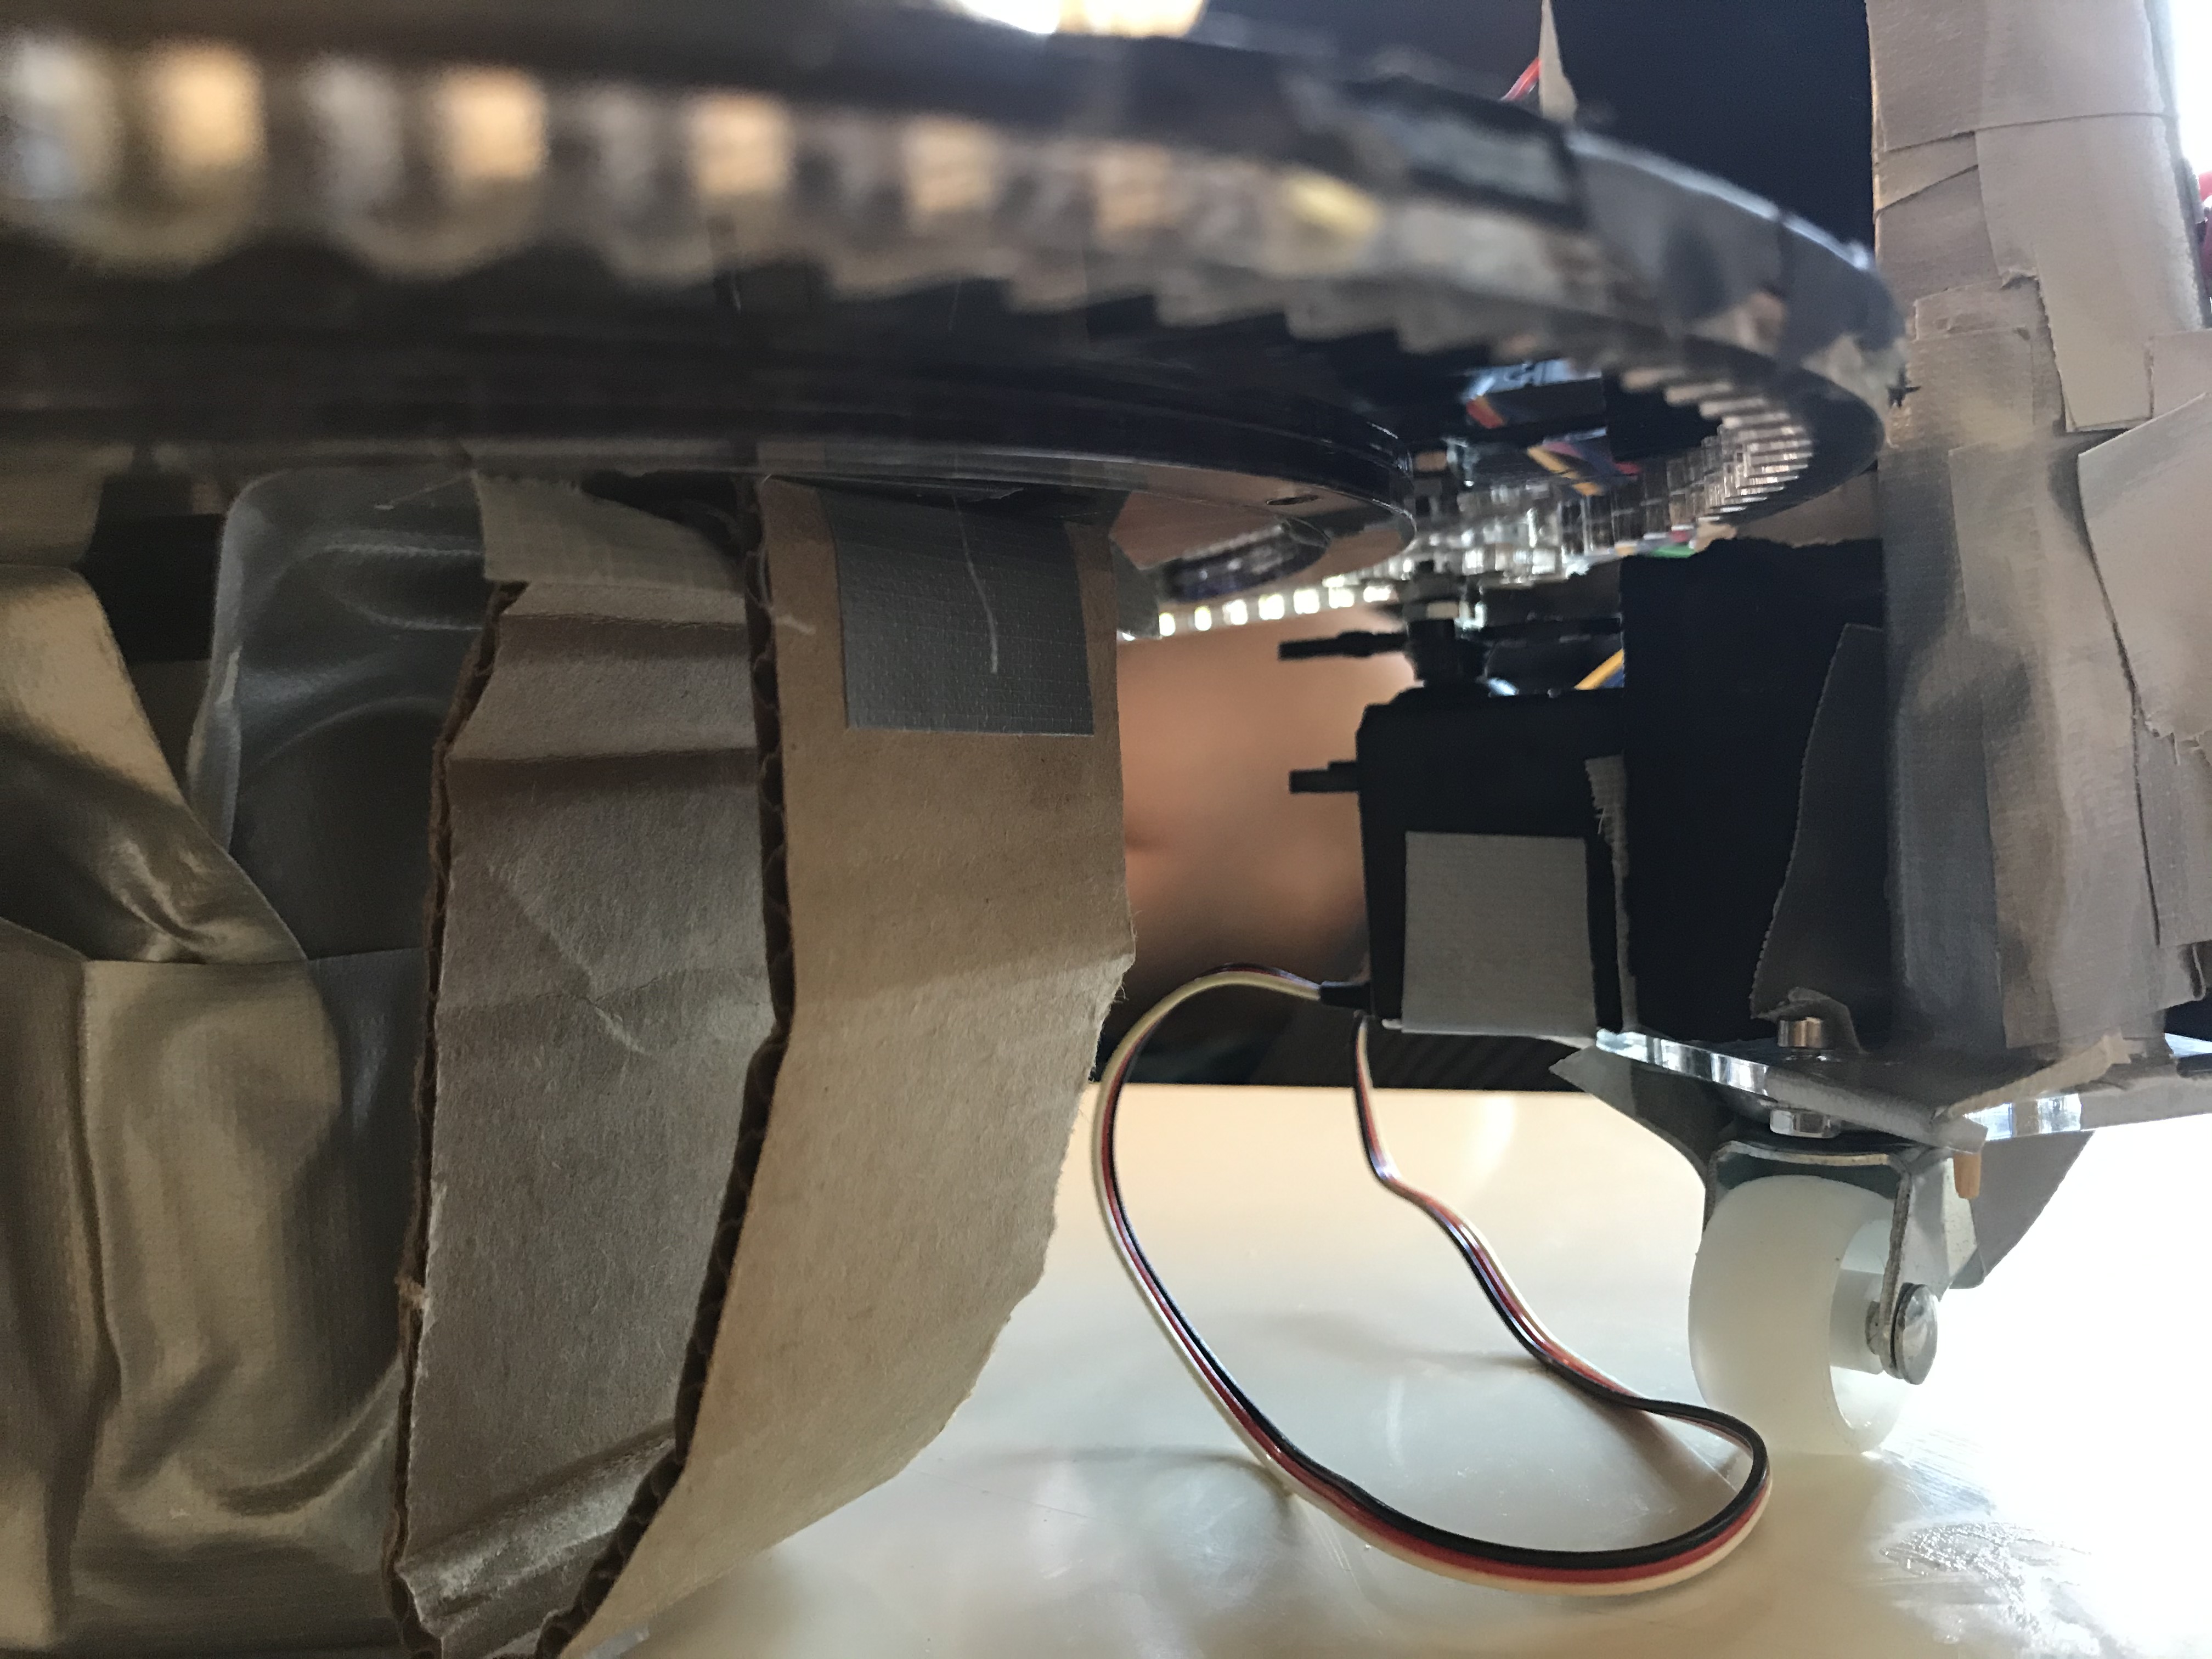
Figure 11: The gear spur often falls out of the rail, and constrainting the bottom wheels has also made the robot fall over easily.
In terms of the hardware and software side, we chose pin 18 as our servo PWM, which unfortunately also controls the piTFT screen. We were unable to find the source of this issue for a long time, although it was very easily fixed. We also tried a few different implementations of our panic button, but ultimately reverted back to the format that we used in Lab 3. The GUI was implemented fairly smoothly, with minimal struggle. Our most significant struggle with software was the openCV detection. We struggled at first to install the software on our RPis, and then spent a decent amount of time trying to understand the different options available. In the end, we were able to detect circles in pictures that we downloaded, and also to take pictures in real life, but had trouble combining the two in our actual program.
Conclusion
Our GUI and cutting code worked successfully, and our openCV cake centering has only a couple of small bugs remaining, namely in resetting our camera to take multiple pictures in our for loop. However, poor meshing of the rack and pinion, and insufficient weight of the cake stand, resulted in a rather haphazard mechanical implementation. The lack of consideration of torque also resulted the cutting not having enough force to cut. Additionally, our product currently results in the camera wire getting tangled after multiple run-throughs. Our solution would be to reverse our cutter motion every other cut, except that we have already constrained the caster wheels. When we manually adjusted or held components in place, our mechanical design worked as intended; however, our goal was to have our design functional without that help.
Future Work
For the future, we would apply many of the lessons we learned in this first prototype towards improving our design. Since our continuous rotation servo was much stronger than we anticipated, we would perhaps move back to our initial and simpler design of a motor in the middle to rotate the cake stand along with a stationary cutter (this would allow us to integrate the camera mount into the cutter rather than having a separate stand as well). We would also re-print our cutter base with several supports to firmly constrain the rack, as the ones that we first imagined were insufficient.
Since we did not manage to have openCV working to our satisfaction, we would definitely spend more time adjusting our settings and making sure that the software detects circular cakes of different heights, and can take multiple pictures in rapid succession so that the user can get multiple rounds of feedback in their centering process. Lastly, we might add some more features to our programs, like a display of what number slice we are cutting and what our current action is to our cutting program.
Work Distribution
Project group picture

Ching Pang
cp546@cornell.edu
Designed the overall GUI and worked with PiCamera and Opencv
Developed cake centering and cake cutting scipt
Assembled the robot and tested out its motion
Michelle DeSouza
md722@cornell.edu
Designed the Mechanical Component
Developed cake centering and cake cutting scipt
Assembled the robot and tested out its motion
Parts List
- Raspberry Pi - Provided in lab
- Raspberry Pi Camera V2 $25.00
- Caster Wheels from Lab 3
- Acrylic Sheet for laser cutting $23.99
- Battery Pack from Lab 3
- DC motor from Lab 3
- Protoboard/ circuit provided
- Pinion from McMaster-Carr $5.19
- Rack from McMaster-Carr $4.23
- DC-pinion mate - 3D print
- DC motor support - 3D print
- Parallax Continuous Rotation Servo - $17.99
- DC motor - Provided in lab
- LEDs, Resistors and Wires - Provided in lab
Total: $76.40
References
PiCamera DocumentParallax Servo Datasheet
Recipe Maker from Fall 2017
Balloon Tracker from Fall 2018
OpenCV Documentation
Pigpio Library
R-Pi GPIO Document
Code Appendix
centercake.py
Allows user to line up the center of the cake using PiCamera and OpenCV
import cv2
import numpy as np
import time
import subprocess
import os
import sys, pygame
from picamera import PiCamera

start = time.time()
tlim = 20
#to pitft
os.putenv('SDL_VIDEODRIVER', 'fbcon')
os.putenv('SDL_FBDEV', '/dev/fb0')
os.putenv('SDL_MOUSEDRV', 'TSLIB')
os.putenv('SDL_MOUSEDEV', '/dev/input/touchscreen')
#pygame setup
pygame.init()

size = width,height = 320,240
screen = pygame.display.set_mode(size)
white = 255, 255, 255
black = 0, 0, 0
screen.fill(black)
pygame.mouse.set_visible(False)
#big font
big_font=pygame.font.Font(None,30)
buttons = {"center the cake better on the plate": (160, 20),
	"the program will proceed when well-centered": (160,40)} #OR SAY "press button 17 when well centered" for GPIO
#GPIO setup - may not need
import RPi.GPIO as GPIO
GPIO.setmode(GPIO.BCM)
GPIO.setup(17, GPIO.IN, pull_up_down=GPIO.PUD_UP)
def GPIO17_callback(channel):
        global waiting
	waiting = False
GPIO.add_event_detect(17,GPIO.FALLING,callback=GPIO17_callback)

#finds circles on an image
def circles(img):
	resized_img = cv2.resize(img,(320,240))
	# convert to grayscale
	gray = cv2.cvtColor(resized_img,cv2.COLOR_BGR2GRAY)
	#img_rgb = cv2.cvtColor(img, cv2.COLOR_BGR2RGB)
	# blur using 3x3 kernel
	gray_blurred = cv2.blur(gray,(3,3))
	#apply hough transform on the blurred image
	detected_circles = cv2.HoughCircles(gray_blurred, cv2.HOUGH_GRADIENT, 1, 200, param1 = 50,
	               param2 = 30, minRadius = 200, maxRadius = 1000)
	x_arr = []
	y_arr = []
	r_arr = []
	# draw circles that are detected
	if detected_circles is not None:
	        # convert the circle parameters a, b, and r to integers
	        detected_circles = np.uint16(np.around(detected_circles))
		i = 0
	        for pt in detected_circles[0,:]:
			x_arr[i] = pt[0]
			y_arr[i] = pt[1]
			r_arr[i] = pt[2]
			i = i+1
	                cv2.circle(img,(pt[0],pt[1]),1,(0,0,255),3)
	                cv2.circle(img,(pt[0],pt[1]),pt[2],(0,255,0),4)
	                cv2.imshow("Detected Circle",img)
	                cv2.waitKey(0)
	return x_arr,y_arr,r_arr
j = 0
#cap = cv2.VideoCapture(0)
centered = False
waiting = True
print(j)
camera = PiCamera()
#camera.start
while ( not centered) and ( time.time() < start+tlim):
	print(j)
	j = j+1
	waiting = True
        time.sleep(0.01)
        screen.fill(black)
#	ret, pic = cap.read()
	#take picture
#	camera = PiCamera()
	camera.start_preview(alpha=255)
	time.sleep (1)
	print('take now')
	camera.capture('/home/pi/imagecake.jpg')
	camera.stop_preview()
	pic = cv2.imread('/home/pi/imagecake.jpg')
#	cv2.imshow('window', pic)
#	cv2.waitKey(0)
        #### process picture ###
	result = circles(pic)
	x_arr = result[0]
	y_arr = result[1]
	r_arr = result[2]
	#find base and cake parameters - assumes cake is second largest circle
	if len(r_arr) > 0:
		base_r = max(r_arr)
		base_ind = r_arr.index(base_r)
		base_x = x_arr.pop(base_ind)
		base_y = y_arr.pop(base_ind)
		r_arr.pop(base_ind)
		cake_r = max(r_arr)
		cake_ind = r_arr.index(cake_r)
        	cake_x = x_arr[cake_ind]
        	cake_y = y_arr[cake_ind]
		cake_error = np.sqrt((cake_x-base_x)**2 + (cake_y-base_y)**2)
		#if cake center off by >8% of plate radius (6.8 in), ask to recenter
		if cake_error > 0.08*base_r:
			for text, position in buttons.items():
			        display_text = big_font.render(text, True, white)
        			rect = display_text.get_rect(center=position)
        			screen.blit(display_text, rect)
			#uncomment to wait for user input
		#	while waiting:
		#		time.sleep(0.05)
		else:
			centered = True
			break
	else:
		display_text = big_font.render("No circles found, try again!", True, white)
		rect = display_text.get_rect(center=(160,120))
		screen.blit(display_text,rect)
	cv2.destroyAllWindows()
	pygame.display.flip()
print("Done!")
GPIO.cleanup()
#cap.release()
cv2.destroyAllWindows()
cakegui.py
Allows user choose how many slices to cut into
# Ching Pang (cp546) Michelle DeSouza (md722)
import RPi.GPIO as GPIO
import time
import os
import sys, pygame
import cv2
import numpy as np
import subprocess

# showing on piTFT
os.putenv('SDL_VIDEORIVER','fbcon')
os.putenv('SDL_FBDEV','/dev/fb0')
os.putenv('SDL_MOUSEDRV','TSLIB')
os.putenv('SDL_MOUSEDEV','/dev/input/touchscreen')

GPIO.setmode(GPIO.BCM)
# bail out button
GPIO.setup(17, GPIO.IN, pull_up_down=GPIO.PUD_UP)
# correspond to on screen button for level 2
#GPIO.setup(27, GPIO.IN, pull_up_down=GPIO.PUD_UP)
#GPIO.setup(23, GPIO.IN, pull_up_down=GPIO.PUD_UP)
#GPIO.setup(22, GPIO.IN, pull_up_down=GPIO.PUD_UP)
def GPIO17_callback(channel):
	global running
	print("quit with bail out button")
	running = 0
	GPIO.cleanup()
# on screen buttons for level 2 detection
#GPIO.add_event_detect(27,GPIO.FALLING, callback=GPIO27_callback)
#GPIO.add_event_detect(23,GPIO.FALLING, callback=GPIO23_callback)
#GPIO.add_event_detect(22,GPIO.FALLING, callback=GPIO22_callback)
# bail out button detection
GPIO.add_event_detect(17,GPIO.FALLING,callback=GPIO17_callback,bouncetime=400)

# pygame setup choosing number
pygame.init()

size = width,height = 320,240
screen = pygame.display.set_mode(size)
small_font = pygame.font.Font(None, 25)
big_font = pygame.font.Font(None, 35)
white = 255,255,255
black = 0,0,0
red = 255,0,0
green = 0, 255, 0
pygame.mouse.set_visible(False)
global running
running = 1
num = "01"
#global num
#global numhist
numhist = ["01"]
# buttons and positions on screen
buttons = {"1": (25,160),"2": (75,160),"3": (125,160),"4": (175,160),"5": (225,160),
	"6":(25,200),"7":(75,200),"8":(125,200),"9":(175,200),"0":(225,200),
	"confirm":(275,160), "reset":(275,200)}
static = {"Number of slices(max 16)": (120,30)}
numpos = (160,100)
warningpos = (160,130)
def updatenum(newnum,number,numhistory):
	global numhist
	global num
	lastchar = number[-1]
	number= lastchar +str(newnum)
#	numhist = [num]
	numhistory.pop(0)
	numhistory.append(number)
	num = number
	numhist = numhistory
	print newnum,number, numhistory
while running:
	time.sleep(0.001)
	screen.fill(black)
	#text for number of slices
	for text,position in static.items():
		display_text = small_font.render(text,True,white)
		rect = display_text.get_rect(center = position)
		screen.blit(display_text,rect)
	# text for options
	for text,position in buttons.items():
		display_sel = small_font.render(text,True,white)
		selrect = display_sel.get_rect(center = position)
		screen.blit(display_sel,selrect)
	# getting the number
	for event in pygame.event.get():
		if event.type == pygame.QUIT:
			sys.exit()
		elif event.type == pygame.MOUSEBUTTONUP:
			pos = pygame.mouse.get_pos()
			xpos, ypos = pos
			if ypos>140 and ypos<180: #torow
				if xpos > 5 and xpos <50:
					updatenum(1,num,numhist)
				elif xpos > 50 and xpos < 100:
					updatenum(2,num,numhist)
				elif xpos >100 and xpos <150:
					updatenum(3,num,numhist)
				elif xpos > 150 and xpos <200:
					updatenum(4,num,numhist)
				elif xpos > 200 and xpos <250:
					updatenum(5,num,numhist)
				elif xpos > 250 and xpos <300:
					# something to confirm and move on to camera
					print('confirm')
					running = 0
			elif ypos > 180 and ypos <220:
				if xpos > 5 and xpos <50:
                                        updatenum(6,num,numhist)
                                elif xpos > 50 and xpos < 100:
                                        updatenum(7,num,numhist)
                                elif xpos >100 and xpos <150:
                                        updatenum(8,num,numhist)
                                elif xpos > 150 and xpos <200:
                                        updatenum(9,num,numhist)
                                elif xpos > 200 and xpos <250:
                                        updatenum(0,num,numhist)
                                elif xpos > 250 and xpos <300:
                                        num = "00" # reset number
					numhist = [num]
					print('reset')
# update number
        display_num = big_font.render(numhist[0],True,white)
        num_rect = display_num.get_rect(center = numpos)
        screen.blit(display_num,num_rect)


	if int(num)>16:
		num = '01'
		numhist = [num]
		warningtext = 'input number <=16'
	elif int(num)==0:
		num = '01'
		numhist = [num]
		warningtext = 'input number > 1'
	else:
		warningtext = 'max slices:16'
	displaywarning = small_font.render(warningtext,True,white)
	warningrect = displaywarning.get_rect(center = warningpos)
	screen.blit(displaywarning,warningrect)
	pygame.display.flip()
print('clean up')
GPIO.cleanup()
cakecutting.py
Carry out motion of cutting cake
from cakegui import num

print(num)
num = int(num)
# calculate based on calibration
# how many rotation does it make based on the

# angle for each slice is 360 deg/n
# 12 rotation of small gear = 1 overall rotation of the whole thing
# angle for each slice
numrot = 12/num
overallangle = 360/num
smallgearangle = overallangle*12 #small gear should rotate perslice

# INITIALIZE DC MOTORS
import RPi.GPIO as GPIO
import time
import os
import sys, pygame
# time.sleep(10)
# showing on piTFT
os.putenv('SDL_VIDEORIVER','fbcon')
os.putenv('SDL_FBDEV','/dev/fb0')
os.putenv('SDL_MOUSEDRV','TSLIB')
os.putenv('SDL_MOUSEDEV','/dev/input/touchscreen')

# set up screen display
pygame.init()
size = width, height = 320, 240
screen = pygame.display.set_mode(size)
size = width, height = 320, 240
screen = pygame.display.set_mode(size)
white = 255, 255, 255
black = 0, 0, 0
red = 255, 0, 0
green = 0, 255, 0
big_font = pygame.font.Font(None,40)
game_font = pygame.font.Font(None,25)
pygame.mouse.set_visible(False)

words = {"cake is cutting!": (160, 50),
	"quit": (280, 220)
}
redpanic = True
ptext = "STOP"
color = red
tlim = 60
GPIO.setmode(GPIO.BCM)
# force quit
GPIO.setup(17, GPIO.IN, pull_up_down=GPIO.PUD_UP)
def GPIO17_callback(channel):
	global running
	print("quit with bail out button")
	running = 0
	GPIO.cleanup()
# set up GPIO pins for buttons
GPIO.add_event_detect(17,GPIO.FALLING,callback=GPIO17_callback,bouncetime=400)
# set up motor pins
GPIO.setup(5, GPIO.OUT) #AI2
GPIO.setup(6, GPIO.OUT) #AI1
GPIO.setup(26, GPIO.OUT) #PWMA
GPIO.setup(13, GPIO.OUT) #pservo
#GPIO.setup(20, GPIO.OUT)
#GPIO.setup(21, GPIO.OUT)
# set output to low for both initially
GPIO.output(5,0)
GPIO.output(6,0)
pdc = GPIO.PWM(26, 100)
pdc.start(20)
#servo
servofreq = 1/(0.020 + 0.0016)
pservo = GPIO.PWM(13,servofreq)
#conversmallgearangle into dc cycle using continuous servo
redpanic = True
changed = False
dc = False
servo = False
started = False
trot = 0.88
rottime = trot*numrot
cuttime = 4
pausetime = 0.25
phase = [1,0,0,0,0,0]
pausestart = 0
cycle = 1*rottime + 2*cuttime + 3*pausetime
start = time.time()
offsettime = start
slice = 0
j = 0
print("starting to cut " + str(num) + " slices")
while time.time() < start+tlim and slice<num:
        time.sleep(0.001)
        screen.fill(black)
        display_p = big_font.render(ptext,True,white)
        p_rect = display_p.get_rect(center=(160,120))
        pygame.draw.circle(screen,color,(160,120),40)
        screen.blit(display_p,p_rect)
        for text, position in words.items():
                display_text = game_font.render(text, True, white)
                rect = display_text.get_rect(center=position)
                screen.blit(display_text, rect)
        for event in pygame.event.get():
                if event.type == pygame.MOUSEBUTTONUP:
                        pos = pygame.mouse.get_pos()
                        #print(pos)
                        xpos, ypos = pos
                        if p_rect.collidepoint(pos):
                                print("panic toggle")
                                redpanic = not redpanic
                        elif (xpos>260) and (ypos>200):
                                print("quitting")
                                tlim = 0
        pygame.display.flip()

        #panic button
        if redpanic:
                color = red
                ptext = "STOP"
                if changed:
			if dc:
                        	pdc.ChangeDutyCycle(20)
			elif servo:
				pservo.ChangeFrequency(1/0.0216)
				pservo.start(1.6/21.6*100)
                        changed = False
			offsettime = offsettime + time.time()-pausestart
        else:
                color = green
                ptext = "RESUME"
                if not changed:
                        pdc.stop()
			pservo.stop()
                        changed = True
			pausestart = time.time()

	if ((time.time()-offsettime) % cycle)<rottime: #servo
		servo = True
		if redpanic and phase[0] == 1:
			pservo.ChangeFrequency(1/0.0216)
			pservo.start(1.6/21.6*100)
			phase[0] = 0
			phase[1] = 1
	elif ((time.time()-offsettime) % cycle)<(rottime+pausetime): #pause
		pservo.stop()
		servo = False
       	        if redpanic and phase[1] == 1:
       	                phase[1] = 0
       	                phase[2] = 1
       	elif ((time.time()-offsettime) % cycle)<(rottime+pausetime + cuttime): #backward
		GPIO.output(5,0)
		GPIO.output(6,1)
		dc = True
		if changed:
			print(dc)
			pdc.ChangeDutyCycle(20)
       	        if redpanic and phase[2] == 1:
			pdc.start(30)
       	                phase[2] = 0
       	                phase[3] = 1
       	elif ((time.time()-offsettime) % cycle)<(rottime+2*pausetime+cuttime): #pivot left
       	        GPIO.output(5,0)
		GPIO.output(6,0)
		dc = False
       	        if redpanic and phase[3] == 1:
       	                phase[3] = 0
       	                phase[4] = 1
       	elif ((time.time()-offsettime) % cycle)<(rottime+2*pausetime+2*cuttime): #stop
		GPIO.output(6,0)
		GPIO.output(5,1)
		dc = True
       	        if redpanic and phase[4] == 1:
			pdc.start(20)
       	                phase[4] = 0
       	                phase[5] = 1
	else:
		dc = False
		GPIO.output(5,0)
		GPIO.output(6,0)
       	        if redpanic and phase[5] == 1:
                       	phase[5] = 0
                       	phase[0] = 1
			slice = slice+1
	pygame.display.flip()
print("Done!")
GPIO.cleanup()